
![]() Launch the Daminion Server Administration panel on PC1.
Launch the Daminion Server Administration panel on PC1.

![]() Go to the menu Administration > Catalogs… and backup all your catalogs (select a catalog > Actions > Backup).
Go to the menu Administration > Catalogs… and backup all your catalogs (select a catalog > Actions > Backup).

![]() Install Daminion Server on PC2.
Install Daminion Server on PC2.
![]() Launch the Daminion Server Admin panel on PC2.
Launch the Daminion Server Admin panel on PC2.

Now we need to move all catalogs from Daminion Server on PC1 to Daminion Server on PC2. Repeat the below steps for all catalogs on PC1:
![]() Create a new catalog on PC2: Catalogs > Actions > New Catalog.
Create a new catalog on PC2: Catalogs > Actions > New Catalog.

Alternatively, you can use the default NetCatalog. In this case, double-click on it to rename it and adjust its settings.
![]() Copy the catalog name from the first catalog on PC1 and paste it as the name of the new catalog on PC2.
Copy the catalog name from the first catalog on PC1 and paste it as the name of the new catalog on PC2.
![]() Adjust “Folder to Store Uploaded Files”, “Folder to Store thumbnails” and “Folder to store video previews” paths or copy them from the first catalog on PC1 if the paths will be the same on PC2.
Adjust “Folder to Store Uploaded Files”, “Folder to Store thumbnails” and “Folder to store video previews” paths or copy them from the first catalog on PC1 if the paths will be the same on PC2.
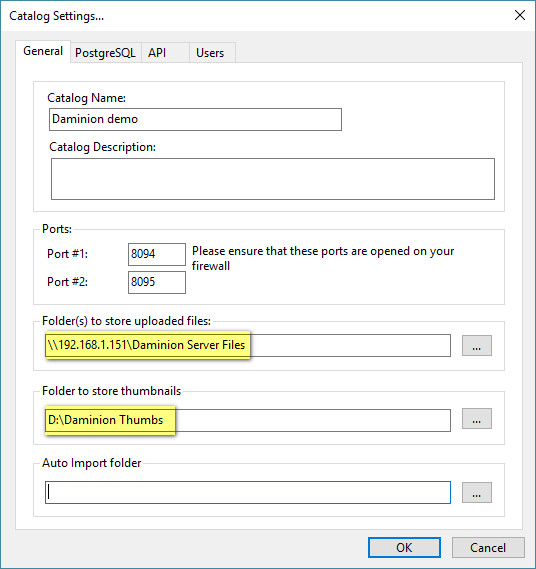
NOTE: The paths shown in the screenshot above are sample paths. The “Auto-Import folder” field can be left blank if not used on PC1.
![]() Copy files from the “Folder to Store Uploaded Files” folder on your PC1 to the “Folder to Store Uploaded Files” folder on your PC2.
Copy files from the “Folder to Store Uploaded Files” folder on your PC1 to the “Folder to Store Uploaded Files” folder on your PC2.
![]() Copy files from the “Folder to Store thumbnails” folder on your PC1 to the “Folder to Store thumbnails” folder on your PC2.
Copy files from the “Folder to Store thumbnails” folder on your PC1 to the “Folder to Store thumbnails” folder on your PC2.
IMPORTANT: If you are using Face Recognition in Daminion 7.5 or higher, it is extremely important to transfer the thumbnail folder correctly from one PC to another! The folder containing the previews of the faces is a sub-folder of the thumbnail folder.
If you are using the web client with video previews activated, copy files from the “Folder to store video previews” folder on your PC1 to the “Folder to store video previews” folder on your PC2.
![]() Restart the Daminion Server if you will be restoring the catalog to the default database “NetCatalog”. If a new catalog has been created, restart PostgreSQL service in Windows services as well.
Restart the Daminion Server if you will be restoring the catalog to the default database “NetCatalog”. If a new catalog has been created, restart PostgreSQL service in Windows services as well.
After that, select a newly created catalog on PC2, click “Actions” and run the “Restore” command from the context menu.
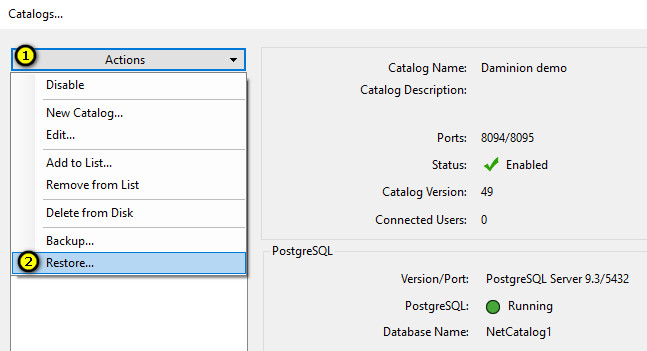
Specify a catalog backup that you created in step 2: NetCatalog##.backup.
You also need to specify the _daminion##.backup file where information about Daminion users is stored, but you can do this only when restoring the first catalog only.

![]() Repeat 5-10 steps for all catalogs on your PC1.
Repeat 5-10 steps for all catalogs on your PC1.
NOTE: If you need to restore multiple catalogs, create new catalogs via Catalogs > Actions> New Catalog. Then restart PostgreSQL service in Windows services and after that restore the backups.
![]() Add a new Daminion Server address on your Daminion Clients.
Add a new Daminion Server address on your Daminion Clients.
Daminion Server address can be found on Daminion Server Administration panel launched on PC2.

– Open Daminion Client
– Click File > Open Shared catalog
– In the window that opens click “Add Daminion server”
– Specify the IP address of PC2 – the catalogs on the new server PC will be listed

– To remove the old server, click the Remove button and select the old server from the list:

– Perform the same on each client station.
Note: You can omit step 12 if a new PC2 has the same name or IP address as your PC1 (if you for example just upgraded the server).
IMPORTANT: If you are also moving the original files from the old location to a new location, you will need to relink the top folder in the Daminion catalog! Please open the Daminion catalog in the desktop application, expand the Folders tab in the Tags panel, select the top folder > Right-click > Relink Folder > point the folder to the new path.
