Images play a vital role in content marketing, especially in the noisy social media environment. They support the information provided in your blog or social media posts and help make it stand out. For example, an A/B test on adding images to social sharing conducted by Buffet last year showed that tweets with pictures received:
- 18% more clicks
- 89% more favorites
- 150% more retweets
However, if you maintain your company’s presence on several social media channels at once, you’ll have noticed that their image-size requirements can vary quite a lot.
Sprout Social has created this very useful cheat sheet on media image sizes which they promise to update regularly. It has comprehensive information on different sizes for different purposes (banners, in-stream photos, timeline photos, etc) for 8 social networks (Facebook, Twitter, LinkedIn and more).
Export Presets in Daminion
This is our how-to on creating Export Presets in Daminion that will make your images the right sizes for the social networks. As an example we’re going to take an image that’s 1200 x 627px, which seems to be work well when added to links on Facebook, Twitter and Google +.
Let’s begin:
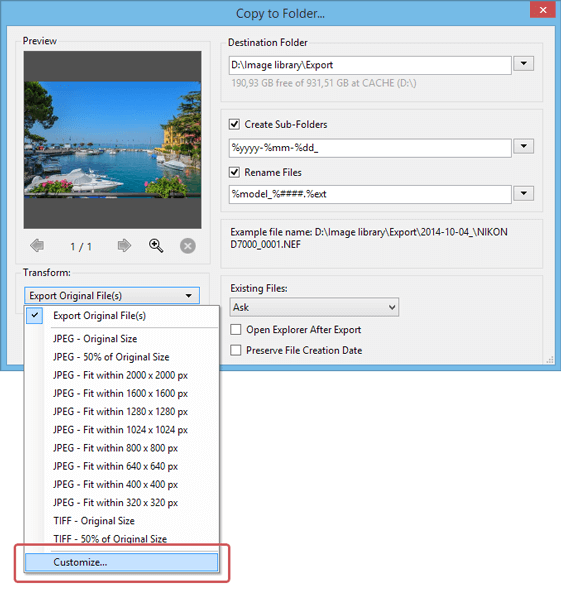
Right click on an image in your Daminion catalog –> Export– > Copy to Folder.

In the “Transform” dropdown menu, choose the “Customize…” command to open the Template Editor (see screenshot above).

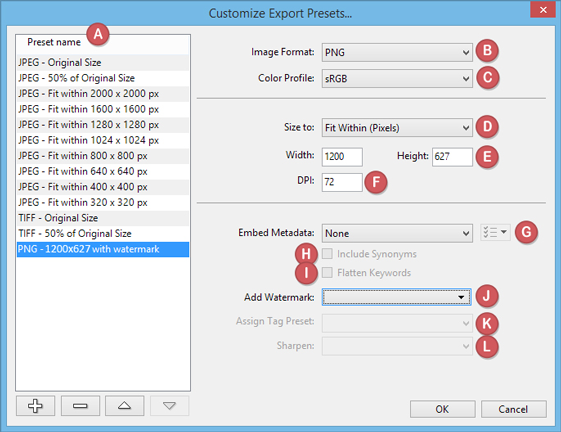
Preset Name (A)
This is a list of all the existing export presets. Newly created custom presets appear at the bottom of the list. Clicking on any of the entries on the preset list will bring up its corresponding settings on the right-hand side of the dialog box.
The buttons at the bottom of this list are for:
 Adding a new preset
 Deleting an existing preset

 Reordering presets in the list
To create a new preset, click the plus sign in the bottom left-hand corner of the dialog box. This will add a new entry to the list and prompt you to give it a descriptive name.

Just overwrite the existing default: “{format} – {sizeto}” with a name that best describes the task it’s going to perform. For example, PNG – Fit within 1200 x 627 px
Alternatively, you can click on any of the presets in the list, customize the existing settings and click on the plus button. This creates a new template based on the changes you made. The name of the new preset is generated automatically based on the size and format settings you chose.
Image Format (B)
Select the desired file type for your images.
Color Profile (C)
Select the color profile to embed in your images. You can apply the default sRGB or let Daminion use the color profile which is already embedded in the image. If you’re not sure what to use, just leave it at the default sRGB, the most commonly used color profile.
Size To (D)
Select a resize option to use in the Width/Height boxes below. If you select “Original Size” the image will not be resized in any way.
Width/Height (E)
Set the desired image size in pixels, inches or centimeters depending on the value selected in option (D) Size To.
DPI (F)
The DPI (dots per inch) setting is only needed for images intended for printing. You can leave it at the default 72 dpi for screen use, or set it to 300 dpi if you want the images to be printable as well. Whatever the case, the DPI setting doesn’t affect the image size – this information is for printing devices only.
Embed Metadata (G)
Decide which metadata you want to embed in your image file. You can choose:
- None (No Metadata is embedded in the file)
- All (All Metadata is embedded in the file)
- All Except Camera Info (All Metadata is embedded into the file except EXIF camera info such as camera make and model or lens used etc.)
- Copyrights Only (Only the copyright information is embedded into the file)
Clicking on the  button (to the right of the metadata entry) allows you to specify which of your own Metadata tags you’d like to include or exclude.
Note: If you intend to publish your images on the internet, it is recommended that you choose “None” to avoid any unwanted publication of personal information. This is because all the metadata contained in an image file can easily be read by other software!
Include Synonyms (H)
Choose whether or not selected tags should contain synonyms.
Flatten Keywords (I)
If you’ve created your keyword structure hierarchically, this is where you specify whether hierarchy levels should be maintained or flattened during the export process.
Add Watermark (J)
Add a watermark to every image.
Assign Tag Preset (K)
Use the “Tag Preset Editor” to select one of Daminion’s preset tags.
Sharpen (L)
Sharpen images that may have been blurred by enlargement during resizing.
Click the “OK” button to close the dialog. The new custom preset is added to the preset list ready to be recalled whenever you need it.
Start the export by selecting a preset from the list or by pressing either the “Copy” button or the F7 function key.
[cta-block]


