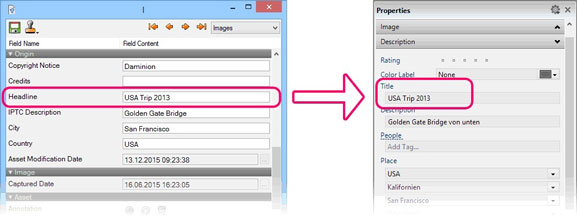
The following tutorial shows you how to import your data when switching from Canto Cumulus to Daminion.
Cumulus has no internal function for exporting all metadata directly to a CSV file. However, if you write your metadata into the original files, they will be read out again when the files are imported into Daminion.
In order to write the catalog information back into Cumulus, you may have to activate the IPTC catalog administration.
To do this, click the Cumulus File menu:
“File” > “Administration” > “Prepare Catalog” > “For IPTC”
In the dialog box that opens, select the corresponding catalog. In the second window (under the heading “Selecting Asset Handling to Prepare for IPTC”) make sure that all entries are selected. Click “Next” and then click “Start”.
This process may take some time to complete, depending on the size of the catalog.
To write back the catalog data, select all assets in Cumulus, and on the File menu, click “Metadata” -> “Write back Metadata…”
Once all Metadata is written into the files, you can import them into Daminion. Most of the common information such as keywords and location tags will be transferred correctly to the associated metadata fields in Daminion. However, some files – particularly those with field names generated internally by Cumulus – cannot be allocated directly from Daminion.
By default, the following Cumulus fields can be imported into Daminion:
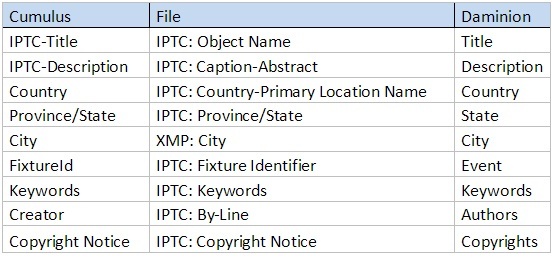
In addition, if you used any field names other than the ones listed in Cumulus (see above), it is recommended that you perform the import using a CSV file in order to assign the metadata fields correctly.
You should therefore do the following:
1. Determine the field names used
2. Adjust the batch file and generate an importable CSV file
3. Import the CSV file and assign the Cumulus field names to the field names in Daminion
1. Determining the actual field names
First, import only one file into Daminion in order to read out the Cumulus field names.
After import, just click the arrow icon in the top right-hand corner of the image thumbnail and select the context menu command “Show All Metadata…”
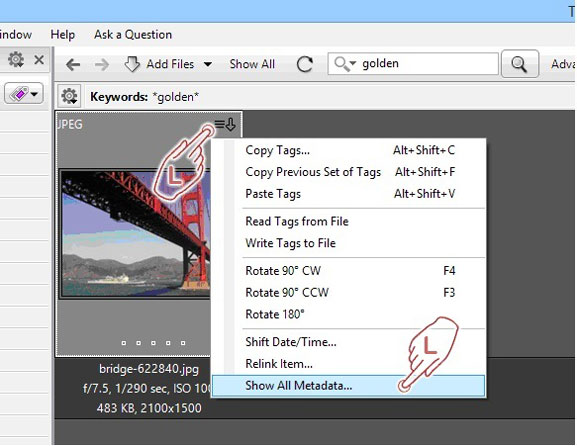
The ExifTool opens and shows you all the information, without exception, stored in the file.
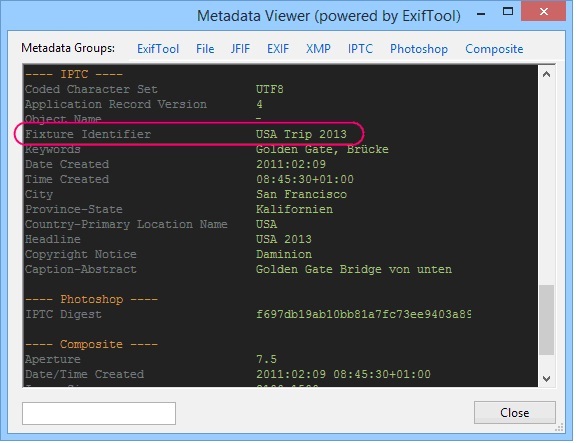
From our example, we can see that the metadata information, “USA Trip 2013”, that was originally entered in the Cumulus “Headline” field, is now located in the file’s IPTC “Fixture Identifier” field. In Daminion this field is linked to the “Event” tag, where it is automatically stored. In the case of our example, the “Title” tag might be a better fit.
So, when importing into Daminion, we should redirect this information to the “Title” tag.
2. Adjusting the batch file
First, download the following batch file from our website.
Place the batch file in one folder above the folder containing the files you want to import.
If your image directory is D:\data\pictures, place the batch file in the folder “data”. In this case, all underlying folders will be read.
Next, open the batch file with Windows Notepad and adjust the data’s source directory accordingly. The corresponding string is located at the end of the batch file and is stated by default:
“x:\DataPath” > out.csv
The string inside the quotes is the path to your data files and out.csv is the name of the CSV file that is created by this batch file. It will be created in the folder where the batch file is located.
The metadata fields to be read must now be entered in the batch file.
In our example, we chose the “Fixture Identifier” field. Please note that in the batch file these names are not allowed to contain spaces, and they must begin with a hyphen. So the correct entry is: ” FixtureIdentifier”.

In this way, you can now search all the required field names from the ExifViewer view and submit them consecutively into the batch file. When finished, save and run the batch file.
3. Import the CSV file and assign the Cumulus field names to the Daminion field names
When the batch file finishes reading the metadata, it creates a CSV file called “out.csv”, which is located in the same folder as the batch file.
Now start Daminion and click the File menu at “File” > “Import” > “CSV file …”.
Daminion will ask you which CSV file to import. After you specify the file’s location, the Daminion Import dialog opens.
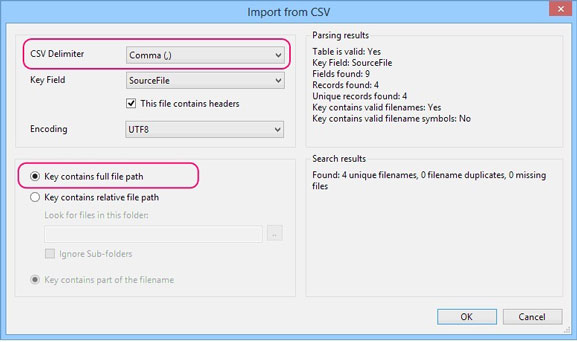
Select “comma” as the “CSV Delimiter” and activate “key contains full file path”.
Once all settings have been entered correctly in the batch file, the exact amount of files found should appear in the right-hand column.
If everything is correct, click OK.
In the next dialog box, reassign the Cumulus fields to the Daminion fields.
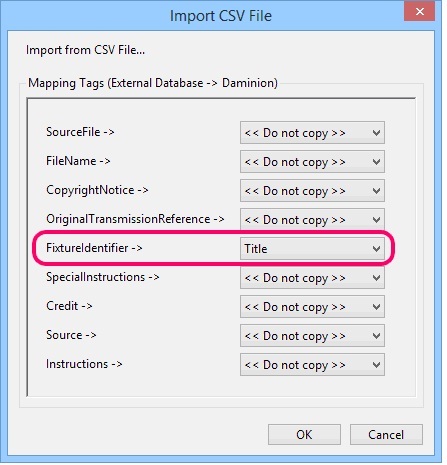
In the “FixtureIdentifier” row, click the “<>” button, select the “title” tag from the drop-down list and click OK.
All metadata will now be written into the Daminion catalog. Tags that were previously stored in Cumulus under “Headline” will now be copied in the Daminion tag field “Title”.
