Categories

User Management in Web Client

Click the three dots icon  on the toolbar and select Settings.

Note: User settings depend on the selected access scheme, see here for details

In the Window that opens click Users to switch to the User Management window, where you can create and delete users or adjust their access rights.

 Click the pencil icon to edit users, click the trash bin icon to delete them.

 Click Create User button to create new users.

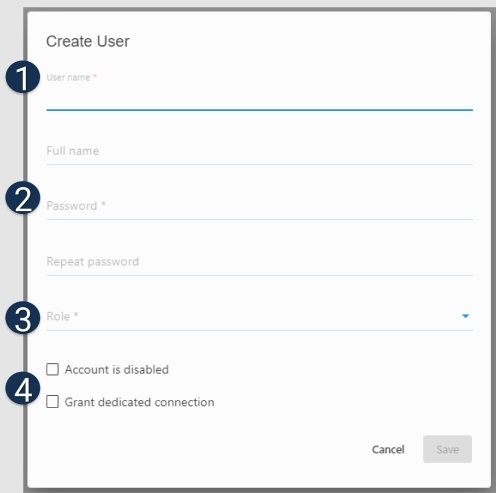
Creating a new user

 1 – Enter user’s name.

 Enter the user’s full name. This field is not required.

2 – Select a password. Be sure to use a good, preferably strong, password.

 3 – Choose a user role from the dropdown list. To find out more about user roles in Daminion, read the article User Management.

 4 – Check this option to temporarily prevent a user from accessing the catalog.

 Grant a dedicated connection to allow certain users to have permanent access to the catalog. This means that one connection is reserved for one particular user only – the remaining connections are shared between the other users.


Users created in the Web-Client are displayed under Users in Daminion Administration Panel for all shared catalogs. And vice versa: users created in Daminion Administration Panel via User Management appear in the user list in the Web-Client.

Note: User roles can be adjusted for each catalog. How to change user roles for different catalogs, read in the article Creating a New Shared Catalog.